Title here
Summary here
This tutorial will demonstrate how to get started deploying applications using the Open Component Model & Flux.
In this guide, we will leverage Flux and the ocm-controller to deploy an existing component to a Kubernetes cluster. Specifically, we will deploy the phoban.io/podinfo component that contains the resources needed to launch the
podinfo application.
Here’s a diagram showing what we’ll be building:
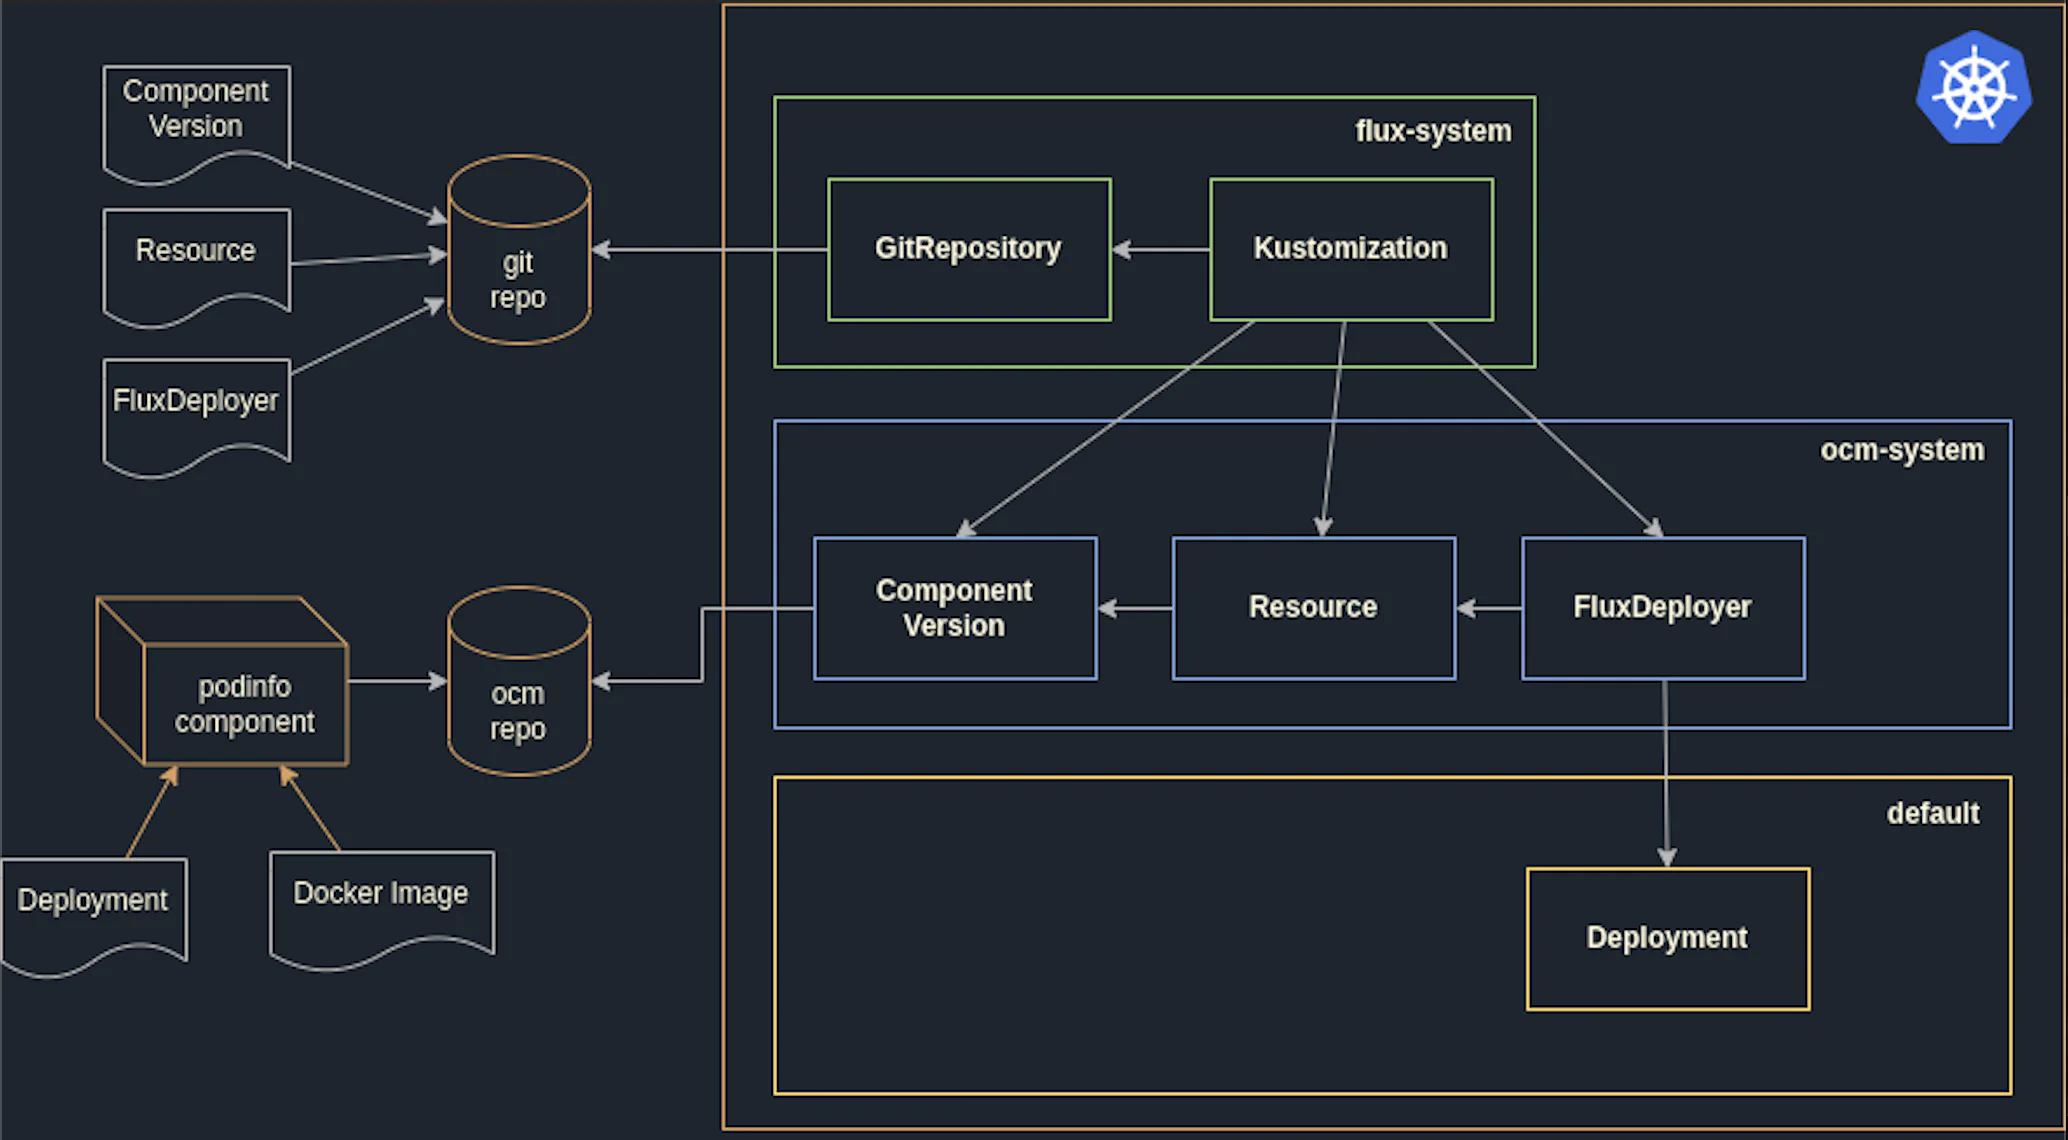
As you can see, we’ll add some manifests to a git repository that will be deployed by Flux. These will, in turn, deploy a resource from an OCM repository, in this case, a Deployment of the podinfo microservice.
If you’d like to learn how to build a component, then check out our Getting Started guide.
First of all, let’s create a cluster using kind:
kind create clusterWith the cluster created, we can now bootstrap Flux to automate the deployment of our component. Flux can create a repository and clone it to our local environment by running the following shell command:
export GITHUB_REPOSITORY=podinfo-flux-repo

flux bootstrap github \
  --owner $GITHUB_USER \
  --repository $GITHUB_REPOSITORY \
  --path ./clusters/kind \
  --personal
This command will create a GitHub repository named podinfo-flux-repo, configure Flux to use it, and deploy the resources in the ./clusters/kind directory to our Kubernetes cluster.
Let’s now clone the repository Flux has created and put in place the manifests required to deploy components:
gh repo clone $GITHUB_REPOSITORY && cd $GITHUB_REPOSITORYWe’ll add a Kustomization to the ./clusters/kind directory in order to reconcile any resources found in the ./components directory:
cat > ./clusters/kind/components_kustomization.yaml <<EOF
apiVersion: kustomize.toolkit.fluxcd.io/v1beta2
kind: Kustomization
metadata:
  name: components
  namespace: flux-system
spec:
  interval: 1m0s
  prune: true
  targetNamespace: ocm-system
  sourceRef:
    kind: GitRepository
    name: flux-system
  path: ./components
EOF
Commit this file, push, and then ensure Flux has reconciled the resource:
git add ./clusters/kind/components_kustomization.yaml
git commit -m "add components kustomization"
git push

# trigger an immediate reconciliation of our repo
flux reconcile source git flux-system

# view kustomizations and their status
flux get kustomizationsDid you know?
Get ready for the next evolution of the Open Component Model, designed to empower your cloud-native workflows. Discover a preview of the innovative ocm-k8s-toolkit
here and be part of shaping the future of component management!
To install the ocm-controller you can use the provided Helm chart from the ocm-controller GitHub project’s ./deploy folder. The Helm chart has also been uploaded to the GitHub container registry as
OCI artifact and this is also the preferred way to install the ocm-controller.
Prerequisites
The ocm-controller require certain prerequisites, like the cert manager and certificate secrets for the in-cluster registry. For details, checkout the prime-test-cluster.sh script under the ocm-controllers repository
hack folder
To install the ocm-controller Helm chart use the following command (replace v0.26.0 with the desired version):
helm upgrade -i --wait --create-namespace -n ocm-system ocm-controller \
oci://ghcr.io/open-component-model/helm/ocm-controller --version v0.26.0Now that we have Flux configured and the ocm-controller installed, we can started deploying components.
We told Flux that our component manifests will live in ./components, so let’s create that directory:
mkdir -p ./componentsTo make the component accessible within the cluster, create the following ComponentVersion:
cat > ./components/component_version.yaml <<EOF
apiVersion: delivery.ocm.software/v1alpha1
kind: ComponentVersion
metadata:
  name: podinfo
  namespace: ocm-system
spec:
  interval: 1m0s
  component: phoban.io/podinfo
  version:
    semver: ">=v6.3.5"
  repository:
    url: ghcr.io/phoban01
EOF
Then create a Resource to retrieve the deployment resource from the component:
cat > ./components/resource.yaml <<EOF
apiVersion: delivery.ocm.software/v1alpha1
kind: Resource
metadata:
  name: podinfo-deployment
  namespace: ocm-system
spec:
  interval: 1m0s
  sourceRef:
    kind: ComponentVersion
    name: podinfo
    resourceRef:
      name: deployment
      version: latest
EOF
Finally, create a FluxDeployer to deploy the Resource contents using Flux:
cat > ./components/deployer.yaml <<EOF
apiVersion: delivery.ocm.software/v1alpha1
kind: FluxDeployer
metadata:
  name: podinfo
  namespace: ocm-system
spec:
  sourceRef:
    kind: Resource
    name: podinfo-deployment
  kustomizationTemplate:
    interval: 1m0s
    path: ./
    prune: true
    targetNamespace: default
EOF
At this point we can commit these files, push to the remote repository, and tell Flux to reconcile the changes:
git add ./components

git commit -m "add ocm manifests"

git push

flux reconcile source git flux-system
Within a few moments we will see the deployment spinning up:
kubectl get po -n default

NAME                       READY   STATUS    RESTARTS   AGE
podinfo-84cb98c9b6-75rx5   1/1     Running   0          1m
podinfo-84cb98c9b6-k4lk8 1/1 Running 0 1mThat’s it! That’s how easy it is to get started using the Open Component Model and Flux.
If you want to know more about working with OCM and GitOps, check out our other guides on this topic: